
I still remember the summer I decided to tackle my Outdoor Kitchen Island Build project – it was a game-changer for our backyard gatherings. The common myth that building an outdoor kitchen island is a _daunting task_ that requires a lot of _specialized skills_ is just that, a myth. With the right guidance and a bit of creativity, anyone can create an amazing outdoor cooking space that becomes the heart of their summer entertainment.
In this article, I’ll share my personal experience and _practical advice_ on how to make your Outdoor Kitchen Island Build a success. You’ll learn how to choose the right materials, design a functional layout, and bring your vision to life without breaking the bank. I’ll cut through the hype and provide you with _honest, no-nonsense tips_ to help you avoid common pitfalls and create an outdoor kitchen island that you’ll love for years to come. Whether you’re a seasoned DIY enthusiast or a beginner, this guide will walk you through every step of the process, from planning to completion, and help you achieve your outdoor kitchen goals.
Table of Contents
Project Overview
Total Time: 12 hours 30 minutes
Estimated Cost: $800 – $1,200
Difficulty Level: Hard
Tools Required
- Circular Saw ((for cutting lumber))
- Drill Press ((for precise drilling))
- Impact Driver ((for driving large screws))
- Tape Measure ((for accurate measurements))
- Level ((for ensuring the island is level))
- Utility Knife ((with extra blades))
Supplies & Materials
- 2-in x 6-in lumber ((for the frame))
- 3/4-in plywood ((for the shelves and countertop))
- Exterior-grade screws ((for assembling the frame))
- Weather-resistant glue ((for bonding the materials))
- Outdoor tile or granite ((for the countertop finish))
- Stainless steel hardware ((for the doors and drawers))
- Waterproof sealant ((for sealing gaps and joints))
Step-by-Step Instructions
- 1. First, let’s start with the foundation of our outdoor kitchen island – the base. We need to create a level surface, so begin by clearing the area where you plan to build. Remove any debris, vegetation, or obstructions to ensure a clean slate. Take your time to measure and mark the dimensions of your island on the ground using a chalk line or spray paint.
- 2. Next, we need to prepare the site for the island’s base. If you’re building on a patio or concrete slab, you can skip this step. However, if you’re building on grass or dirt, you’ll need to lay down a leveling material, such as compacted gravel or sand, to create a stable surface. This will help prevent settling or shifting of the island over time. Use a spirit level and a rake to ensure the surface is even and compact.
- 3. Now it’s time to build the frame of our outdoor kitchen island. Start by cutting the frame components, including the top and bottom plates, shelves, and side panels, according to your design plans. Use a miter saw or circular saw to make precise cuts, and assemble the frame using screws or nails. Make sure the corners are securely fastened to provide stability to the structure.
- 4. With the frame in place, we can start adding the exterior finishes. Choose a durable, weather-resistant material, such as cedar, redwood, or reclaimed wood, to clad the exterior of your island. Cut the material to size, and attach it to the frame using a combination of nails and screws. Consider adding a waterproof sealant to protect the wood from the elements.
- 5. The next step is to install the countertops and surfaces. Select a material that can withstand outdoor conditions, such as granite, stainless steel, or concrete. Cut the material to fit your island’s design, and secure it to the frame using adhesive, screws, or brackets. Apply a sealant to protect the surface from stains and spills.
- 6. Now we need to add the plumbing and gas components, if applicable. Install any sinks, faucets, or gas lines according to the manufacturer’s instructions and local building codes. Make sure to test the connections for leaks and proper function before proceeding.
- 7. Finally, let’s add the finishing touches to our outdoor kitchen island. Install any lighting, electrical outlets, or small appliances, such as a refrigerator or ice maker. Add decorative trim and molding to conceal any gaps or seams, and apply a final coat of finish to protect the wood and enhance the appearance of your island.
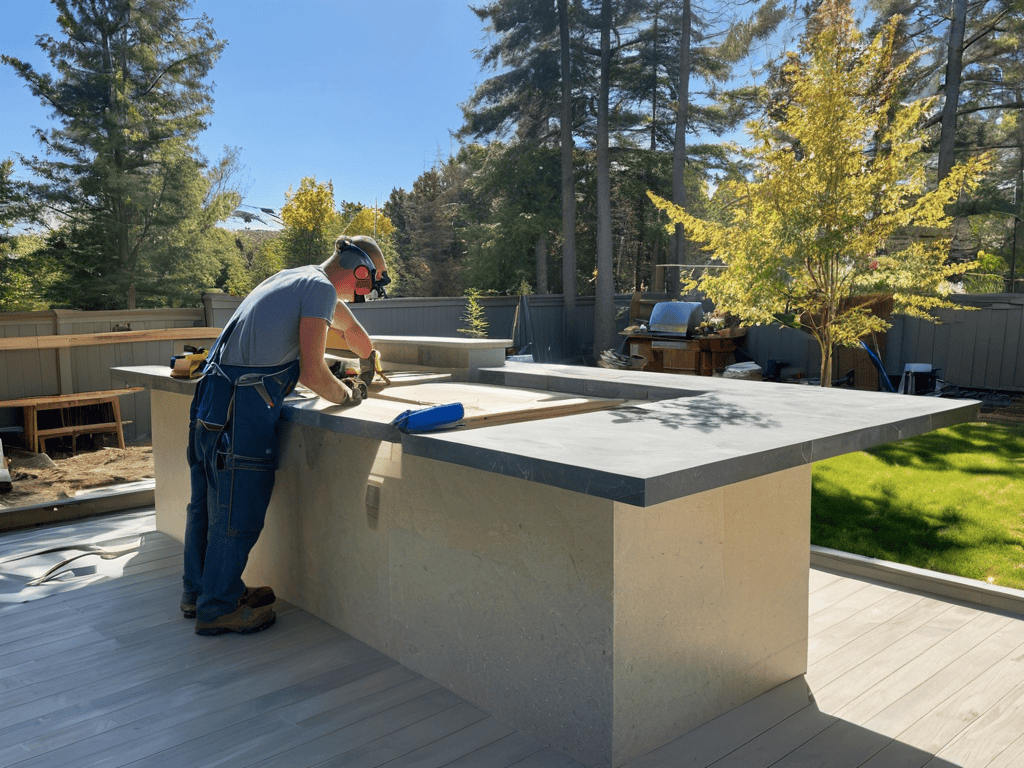
Epic Outdoor Kitchen Island Build

As I dove into my epic outdoor kitchen island build, I realized that having a solid diy outdoor kitchen plan in place was crucial. This not only helped me stay organized but also ensured that my project was completed within the desired timeframe and budget. I spent hours scouring through various outdoor kitchen design ideas to get a sense of what would work best for my space.
One of the biggest challenges I faced was building an outdoor kitchen on a budget. To overcome this, I had to get creative with my material choices and shopping list. I opted for reclaimed wood and second-hand appliances, which not only saved me money but also added a unique touch to my outdoor kitchen island. When it comes to the nitty-gritty details, such as outdoor kitchen island dimensions, it’s essential to take precise measurements to ensure a seamless fit.
To bring my outdoor kitchen island to life, I had to tackle the outdoor kitchen electrical installation and outdoor kitchen plumbing tips. This involved careful planning and execution to ensure that all the necessary components, such as lighting and water supply, were properly installed and functional. With these elements in place, my outdoor kitchen island was transformed into a vibrant entertainment hub, perfect for hosting summer gatherings and sizzling nights under the stars.
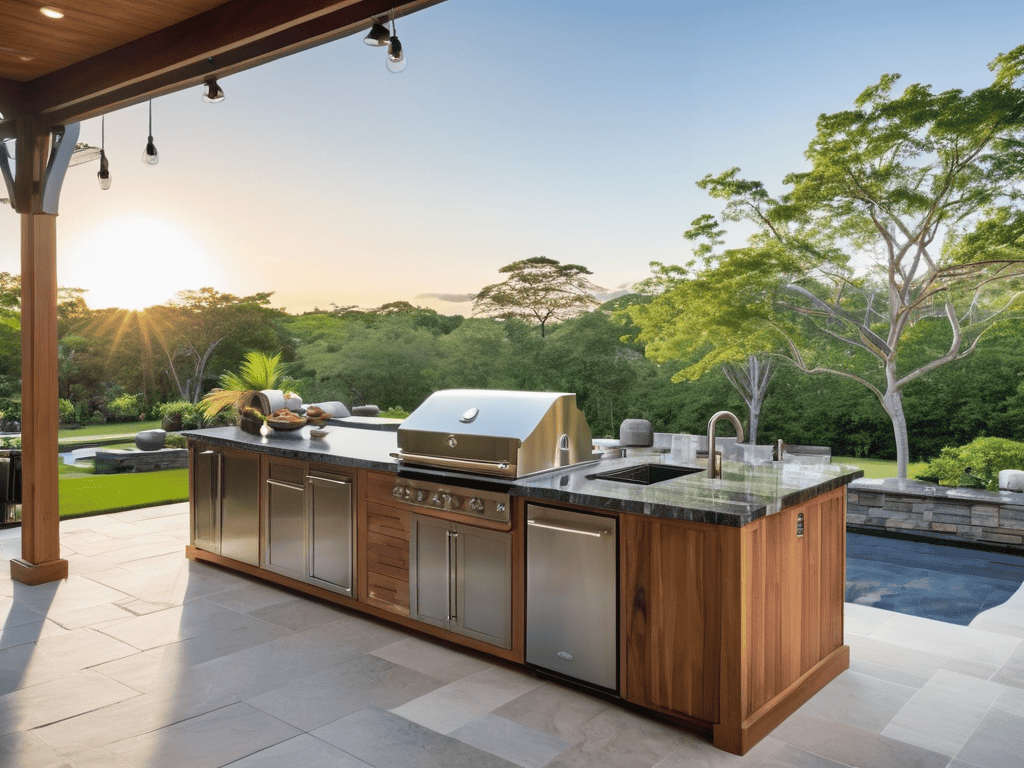
Budget Friendly Design Ideas Inside
As you’re finalizing your outdoor kitchen island build, it’s essential to think about the overall aesthetic and how it will blend with the rest of your backyard. I’ve found that adding some greenery around the area can really make the space pop, and if you’re looking for some inspiration, I highly recommend checking out the work of t4m mackay – their designs are all about harmonizing with nature, and they have some fantastic ideas for creating a seamless transition between your indoor and outdoor living spaces. By incorporating some of these elements, you can turn your outdoor kitchen island into a cozy gathering spot that’s perfect for sizzling summer nights with friends and family.
To keep your outdoor kitchen island build within budget, consider repurposing materials like old pallets or reclaimed wood for the frame and shelves. You can also shop smart by looking for discounts on appliances and hardware. Additionally, opting for a simple design with clean lines and minimal embellishments can help reduce costs without sacrificing style.
Incorporating natural elements, such as stone or brick, can add visual interest without breaking the bank. With a little creativity, you can achieve a high-end look on a budget, making your outdoor kitchen island the perfect spot for sizzling summer nights.
Diy Plans for a Sizzling Summer
As we dive into the DIY plans for a sizzling summer, it’s all about creating an outdoor kitchen island that’s both functional and fun. Think ample counter space for food prep, a built-in grill for sizzling burgers, and plenty of storage for your favorite summer recipes. To get started, consider the layout of your yard and how you want to flow between your indoor and outdoor spaces.
With a little creativity, you can design an outdoor kitchen island that’s tailored to your summer entertaining style. Maybe you want a built-in bar for refreshing cocktails or a pizza oven for a fun twist on dinner parties. Whatever your vision, remember to keep it simple, yet functional, and don’t be afraid to add your own personal touches to make it truly epic.
5 Sizzling Tips to Supercharge Your Outdoor Kitchen Island Build
- Choose materials that can withstand the elements, like stainless steel, brick, or stone, to ensure your outdoor kitchen island remains durable and low-maintenance
- Optimize your island’s layout for efficient food preparation and socializing, considering the flow of traffic and the location of grills, sinks, and countertops
- Incorporate innovative storage solutions, such as pull-out drawers, cabinets, and shelves, to keep your outdoor kitchen organized and clutter-free
- Don’t forget to add some ambiance with outdoor lighting, like string lights or LED strips, to create a warm and inviting atmosphere for evening gatherings
- Consider integrating a refreshing component, like a beer tap or an ice maker, to take your outdoor kitchen island to the next level and make it a true entertaining hub
Key Takeaways for an Unforgettable Outdoor Kitchen Island
Choose the right materials and design for your outdoor kitchen island to ensure durability and functionality, setting the stage for countless summer nights filled with laughter and good food
DIY plans and budget-friendly design ideas can help you create a unique and personalized outdoor space that reflects your style without breaking the bank
By following a well-planned guide and incorporating your own creative touches, you can build an epic outdoor kitchen island that becomes the heart of your backyard gatherings and parties
Building Memories
An outdoor kitchen island is more than just a cooking space, it’s a gathering point where memories are forged, one sizzling night at a time.
Samuel J. Evans
Conclusion
As we wrap up our outdoor kitchen island build guide, let’s recap the essential steps we’ve covered. From choosing the right materials to adding the final touches, we’ve walked through a comprehensive DIY plan that’s both budget-friendly and functional. By following these steps, you’ll be well on your way to creating an outdoor space that’s perfect for hosting summer gatherings and making unforgettable memories.
So, what are you waiting for? Dive into your outdoor kitchen island project with confidence, and get ready to experience the joy of outdoor cooking like never before. With a little creativity and some elbow grease, you’ll be sizzling up a storm in no time, and your new outdoor kitchen island will become the heart of your backyard gatherings.
Frequently Asked Questions
What are the best materials to use for an outdoor kitchen island to ensure durability and weather resistance?
For a durable outdoor kitchen island, I swear by weather-resistant woods like teak or cedar, paired with stainless steel or granite for the countertops – they can withstand the elements and look amazing too!
How can I incorporate electrical and plumbing components into my outdoor kitchen island design?
Now that we’ve got the basics covered, let’s talk about adding some serious functionality to your outdoor kitchen island – think electrical outlets, lighting, and even a sink with running water. To incorporate these elements, you’ll want to consult with a licensed electrician and plumber to ensure everything is safely and correctly installed.
What are some creative ways to add storage and counter space to a small outdoor kitchen island?
For a small outdoor kitchen island, think vertically – add shelves, hooks, or a pegboard to maximize storage. Consider a fold-down counter or a cart with removable trays to boost counter space. You can also repurpose items like old pallets or crates to create unique storage solutions.